Tile Flooring Installation: How Experts Prepare Surfaces for Flawless Tile Work
Tile flooring is not just about installing tiles on a surface; it’s about creating a cohesive and visually appealing space. The secret to a successful, long-term, attractive installation begins long before the application of an adhesive, and professional installers are equipped with the necessary knowledge. The result depends on each step taken to lay the first tile. Types of surface preparation either break or enhance the endurance, appearance, or feel of the products. This is an important stage that professionals target to avoid future repairs and unsightly flaws. Every flawless finish begins with proper Tile Flooring Installation.
Understanding the Key Steps in Surface Preparation
Every one of the steps described below illustrates the preparation that should be taken absolutely care of when carrying out a tile flooring project. Installed takes a systematic approach that provides quality results on a frequent basis.
Removing Existing Flooring with Precision
Old flooring materials often create complications during tile installation. Experts begin by evaluating what lies beneath the surface. Carpet, vinyl, laminate, or damaged tiles should be removed carefully to prevent damage to the subfloor. Lifting of these materials can often be done with power scrapers, pry bars, and grinders, allowing for adhesively free removal for remodeling purposes.
Before taking any additional action, the floor should be thoroughly stripped. The residue of glue, dust, or debris might compromise the attachment of new tiles to the base. Having the surface removed means a clean slate that defines the success of Tile Flooring Installation.
Assessing and Repairing Subfloor Conditions
Improperly leveled or broken subfloors may result in broken tiles and out-of-joint grout lines. Professionals take time to inspect the subfloor thoroughly. All dips, raised areas, and dried-up notes are corrected prior to the installation of any components. The cycles on concrete foundations are checked with the help of a level, and wood subfloors are scrutinized for the possibility of warping, cracks, or warped pieces.
When the problems are detected, experts use leveling compounds or do structural fixes. Ensuring that the tiles are evenly laid will be achieved by creating a smooth and firm subfloor. By omitting this procedure, one risks compromising the integrity of the entire flooring system. Proper preparation always precedes seamless Tile Flooring Installation.
Ensuring Proper Moisture Control
One of the greatest enemies to tile life is moisture. The installer is aware that when controlling it, one prevents mold and adhesive failure, as well as future lifting. Moisture meters are used to determine whether a concrete floor is too wet or too dry. When moisture cannot be maintained at safe levels, a moisture barrier or membrane is installed to prevent damage.
Moisture control is even more crucial in areas that are prone to moisture, such as bathrooms or basements. Products such as waterproof underlayment are designed to protect both the tiles and the base. This is a major element when it comes to improving the quality of any Tile Flooring Installation.
Applying the Right Underlayment
Underlayment helps in the connection between the subfloor and the tile layer. The correct decision to make depends on the type of tile, subfloor materials, and the conditions in the rooms. Cement backer boards are also used as they produce rigidity and moisture resistance. To prevent cracks from spreading to the tile, uncoupling membranes are applied.
Installation of underlayment requires accuracy. Fasteners should be laid out properly, and seams have to be staggered and edges sealed. The underlayment provides a good foundation on which the tiles rest once they are installed. Avoiding or improperly implementing such a layer can cause loose tiles or cracked tiles to occur. Every expert prioritizes underlayment during Tile Flooring Installation.
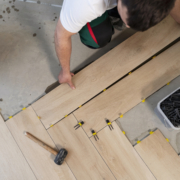
Marking Layouts and Planning Ahead
Instead of setting any tiles, the experts draw a floor layout before setting them. This will result in a well-proportioned-looking piece, and it will not cut tight along walls or corners. Chalk lines or laser levels are used in drawing panels to help installers place the tiles accurately at first glance.
During this planning phase, there is time to dry-fit several tiles, recheck the spacing, and verify the direction of the pattern. This is the stage when adjustments can be made easily, as compared to after spreading adhesive. Accuracy here saves time and prevents costly errors in the future. Experienced Tile Flooring Installation has the mark of well-achieved layout planning.
Conclusion
In every beautiful tiled floor art, power lies not in the fixing of the first tile but in the prudent planning done way beforehand. Technique, tools, and experience are the factors that enable professionals to ensure that no step is hasty and that no steps are forgotten. Beautiful, durable outcomes are never accidental. In any Tile Flooring Installation, quality always starts with professional surface preparation.