How to Check Rebar Placement in Your Footings
Footings are the foundation. Literally. Get them wrong and your whole project could go sideways. It’s not just about pouring concrete and calling it a day. Rebar placement? That’s where the magic (and stability) happens.
Let’s break it down in plain English, especially for New York builders, DIYers, or even curious homeowners. Because knowing how to check your rebar game could save you big bucks down the line.
Why Footing Rebar Placement Even Matters
Here’s the deal. Rebar, short for reinforcing bar, gives your concrete strength. Think of it like bones inside a body. Without it? Concrete cracks. Shifts. Crumbles under pressure. And in NY, with our freeze-thaw weather and crazy soil conditions, that’s a risk you don’t wanna take.
Proper placement helps distribute loads evenly. It makes the structure durable and safe. But if the bars are off, even by an inch, it can compromise the whole footing.
Start With the Blueprint (Don’t Skip This)
Before you even look at the site, check the plans. Sounds basic, but you’d be shocked how many skip this.
Your structural drawings will have exact locations, spacing, and size of each bar. This is what you’ll use to cross-check on-site. If it’s unclear, talk to the project engineer.
Don’t assume the contractor always follows the plan perfectly. It’s your job to verify.
On-Site? Here’s What You Need to Look For
Grab a measuring tape. Maybe a rebar locator if you’re fancy.
Now, look at these things:
- Spacing: Bars should match what’s on the drawings.
- Clear Cover: This is the space between the rebar and the edge of the concrete. It protects the steel from rust and fire.
- Tie Wire and Positioning: Bars should be secured. No loose pieces wobbling around.
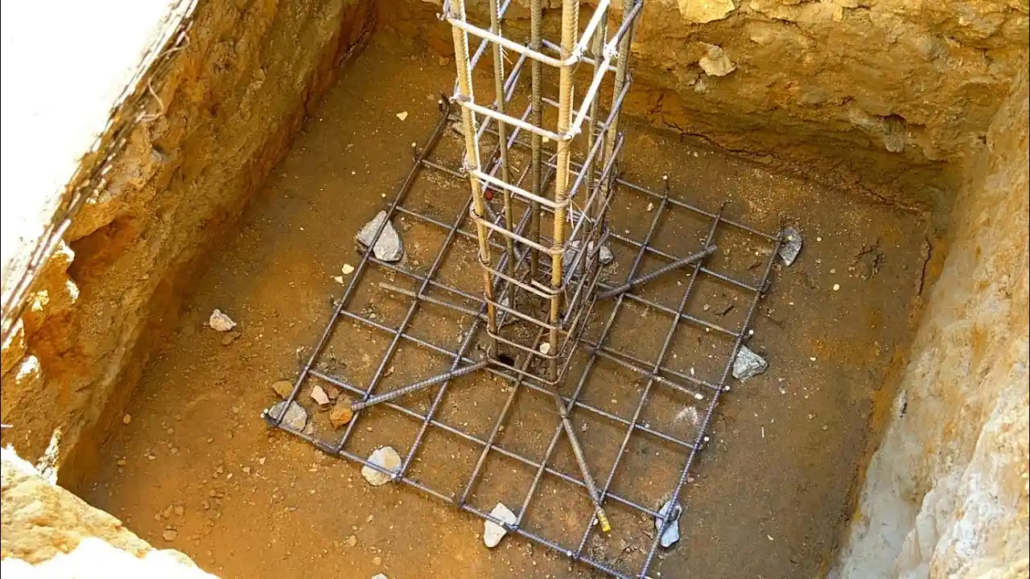
- Support Chairs: These keep the bars off the ground and in the right place vertically.
Here’s where the keyword fits perfectly: If you want an accurate rebar in footing detail, make sure to check dimensions and depths using both tools and your eyes. Don’t trust just one method.
Mid-Check: One Mistake That Happens All the Time
Let’s say you’re halfway into the inspection. Everything looks okay. But here’s a sneaky issue — bar overlap. Especially at corners or joints. If overlaps are too short, the structure gets weak points.
Measure the overlap (usually 40x the bar diameter unless otherwise stated). If you’re unsure? Ask your structural guy.
This is also where rebar detailing comes into play. Good detailing isn’t just drawing lines on paper — it guides placement on the ground. Bad detailing? That’s a one-way ticket to cracked footings.
Local Conditions? NY Has Its Own Set of Issues
Let’s talk New York soil and weather. In some parts of upstate, you’ve got clay-heavy soil. In the city? Sandy fill. Long Island? A mixed bag.
These conditions affect how deep your footings need to go and how strong they must be. If your footing design considers frost lines or load-bearing capacity, your rebar needs to be placed accordingly. Check for adjustments made due to local inspection requirements too. Some municipalities get really picky.
Another NY-specific tip: if you’re close to saltwater or road salt areas, corrosion is a huge risk. That means rebar needs extra protective cover. Sometimes even epoxy-coated rebar.
Common Errors (And How to Spot ‘Em Fast)
Let’s say you’re walking the site and something feels off. Here are some red flags:
- Bars touching the formwork. That’s a no-no.
- Missing chairs or spacers.
- Different bar sizes from the drawing.
- Rusted bars that haven’t been cleaned.
- Bars that shift when lightly kicked (they shouldn’t).
Quick hack: Carry photos of what correct setups should look like. Visual comparison helps spot errors instantly.
Double Check Before the Pour
Concrete waits for no one. Once the truck shows up, it’s go-time. So, your pre-pour check is the final call.
Walk through slowly. Take your time. Look from different angles. Even lie down and look up into the trench if needed. It sounds weird, but it works.
Document everything. Photos. Notes. Measurements. If there’s an issue and you don’t have proof? That’s on you.
The Human Element: Don’t Skip the Talk
Even if you’re not the contractor, talk to the team. Ask questions. Listen. Most mistakes happen because of rushed work or miscommunication.
Respect on-site experience but don’t hesitate to question something that feels off. That’s how pros work.
Keep it Local: Who to Contact if You’re Not Sure
Need an expert eye? Want someone local who knows NY codes inside out?
Reach out to consultants or engineers who specialize in structural work in your area. This includes firms that’ve worked with NY’s diverse soil and climate factors. And yes, some offer inspection services specifically for rebar.
In fact, if you’re looking for a trusted local resource, check out Strand Consulting. They’ve got a solid rep around NY construction circles for site inspections and consulting support.
Final Word: Don’t Just Hope It’s Right
Your footings are the base of everything else. If the rebar’s wrong, the cracks don’t show up until it’s too late. So take the extra time. Do that walkaround. Ask that question. Snap that photo. Because when done right? That footing becomes a rock-solid foundation for years of safety and peace of mind.
Leave a Reply
Want to join the discussion?Feel free to contribute!